TOP NEWS

Welcome to I Scream Kitchen! This is a blog to inspire you to try new dishes and make your cooking experience a pinch more fun!

Showing posts with label Dessert. Show all posts

Sunday, 24 July 2016

Vegan Avocado Chocolate and Banana Ice-Cream Melba


The heat has finally hit and we are currently enjoying the approximately 2-week long summer in Stuttgart, Germany. Long gone and forgotten are the times of optimistic new-year’s resolutions about healthy dessert-less eating and gym sessions n times per week (what was I thinking anyway). The results of my forgetfulness are ominously weighing over my head (and hips) like a big lard-shaped cloud J And to make things even better, it’s both bikini and ice-cream season, people…

Joking (and self-pity) aside, I have the belief that most people, me often included, put way too much importance on those 2 extra kilos (approx. 4.5 pounds for you American amigos), which bewitch us into obscene and cruel self-esteem destructing thoughts. What’s worse, it seems that the only thing that makes us feel any better is that evil ice-cream/chocolate/butter straight from the package (o.O); so much for vicious circles.  Most of us are not obese and that little extra love handle here or that thigh dimple there are not making us any less the attractive, awesome humans that we are. And, honestly spoken we could use this time we spend on obsessing about this stupidity on something a bit more useful, like learning a new language or browsing funny cat videos on the internet, to name a few.

That said, during a dinner party, one of my friends shared his disturbing experience watching a documentary on the terrifying health effects of sugar on the human body and the hidden sources of refined sugar, which made him quit eating fruit yoghurts, ketchup, etc. After going home, drunk on surprisingly good local wine and foolishness, my boyfriend and I googled around and watched a ton of documentaries on the subject (we should have stuck with the funny cat videos). Next day, he skipped on the 2 spoons of sugar in his coffee (an unshakable habit) and I, throwing an evil eye on the bbq sauce in the fridge, made my own sugar-free version.

After this dinner party, my interest in reducing refined sugar in my diet has really risen…unlike my sweet tooth. My solution has been to eat a lot more home-made and high on benefit-for-your-calorie meals and desserts, meaning food rich in fiber and vitamins, making eating it worth it, rather than stuffing myself with cake, which does nothing for my health. Often times, this approach also gives you the benefit of being a lot less lardening, as well J

One of my favourite recipes has been this healthy avocado chocolate mousse and banana ice-cream combination, which I served also to my “parents in law”. It left them slurping in excitedness like little children J This recipe doesn’t taste healthy, just purely delicious. The mousse can be used also as icing on top of cakes, it’s brilliant, nobody will know it’s avocado-based unless you tell them, trick your kids, people J.

If you made it so far, your patience is awarded by the amazing recipe:

Ingredients:

For the avocado mousse:

1 ripe avocado
7 tblsp unsweetened cacao powder
7 tblsp raw honey or maple syrup
1 pinch salt
1 pinch cinnamon
1 splash vanilla extract (I made my own)
1 splash water/your choice of milk (if necessary)

For the banana ice-cream:

2 ripe bananas (with little light brown flecks on them)

Garnish (optional):

Raspberries
Homemade jam (sour types fit better)
Cacao nibs
Maple syrup/coconut syrup

Preparation:


1. Peel and cut the bananas in small wheels, put in a sandwich bag to lay as flat as possible (1 layer) and freeze.

2. Put all your avocado ingredients in a kitchen robot/blender/food processor and blend until completely smooth. The amounts are just a guide. The goal is to add enough cacao powder and honey to no longer taste the grassy flavor of the avocado. Don’t skip the cinnamon even if you dislike it! The mousse doesn’t taste like cinnamon with just 1 pinch. It just helps degrassinate the flavour J if you feel the mixture is too thick, add either a bit of water or your choice of milk, be it animal or vegan and blitz.

3. Put the mixture in the fridge to cool down.

4. Put your frozen bananas in a kitchen robot/blender/food processor and start pulsing. After you have reached a crumby consistency, just continue on full speed until you get soft ice-cream texture.

The consistency of bananas, you are looking for (you can add anything you like for extra flavour like cacao or nut butter)
5. Arrange the banana ice cream and the chocolate mousse in a bowl or an ice-cream cone and garnish with your choice of fruit, syrups and nuts. My favourite combo is raspberries, coconut syrup or sour jam and cocoa nibs.

My scrumptious home-made ingredients: apricot jam from my mother in law, self-made vanilla extract and honey from my grandpa's bees.
6. Enjoy your guilt free treat!

The delicious end result
17:25 Posted by IScreamKitchen 0

Wednesday, 24 December 2014

The Holiday Tiramisu


More and more, I realize that I'm highly addicted to desserts! If you haven't realized that yourselves already, counting the sweet recipes on this blog. Funnily enough, I tend to get obsessed with a certain recipe and I make it until I and everybody around me can't take it any more. This one is no exception. 

Last year, in my quest to find a replacement for the discontinued Edeka (German supermarket chain) frozen tiramisu (best ready-made tiramisu ever created), I found this recipe, which I updated to suit my particular taste. I'm not a huge fan of poisonously sweet desserts, so I have majorly reduced the sugar content. Furthermore, my boyfriend made a comment, that it would be great to use spekulacius cookies instead of lady fingers. I thought "no way"! Speculacius are quite a Christmassy cookie originating from the Belgium/Netherlands/Germany region and are quite spicy and especially rich in cinnamon.  You can successfully substitute them with any other Christmas cookie you might have; however, it should be crispy rather than soft. A perfect option would be the home-made honey cookies I posted a couple of years ago on my blog.

Spekulacius cookies
But anyway, I decided to make it with the speculacius cookies to shut him up make him happy. I had to eat my metaphorical hat. Don't you just hate when that happens? I think I made it over 10 times since and every time I make it for somebody else, he likes to remind me it was his idea. I got it, you were right, let's move on :)  We ate it so much that I can barely look at it anymore! And... if I say so myself, it's the best one I've ever had!

It's not really difficult to make but there are a couple of tricky bits you have to overcome and there's a good amount of waiting you have to do. I'd say it's perfect for the holidays, especially if you're making a big meal yourself and you have a few spare minutes here and there for the different steps.

Here are the ingredients.

The holiday tiramisu recipe:

6 egg yolks (room temperature)
1/2 cup castor sugar
2/3 cup milk (room temperature)
500 ml/ 17 oz cream for whipping (use animal one, none of that plant-based crap)
1 tsp butter vanilla essence
500 g/1 lb mascarpone cheese
1/2 cup cold espresso
1/3 cup gold rum
1 package (approx. 200 g/7 oz speculacius/ Christmassy cookies/honey cookies)
cocoa powder for sprinkling on top (unsweetened)

Preparation:

1.Beat the egg yolks well with the sugar in a saucepan until they change to a lighter creamier colour. See below. Add the milk and whisk together.

Mixed egg and sugar texture
2. Place the mixture over low to medium heat and constantly whisk. Don't stop whisking. If you do, the bottom will burn and you'll have gross burnt eggy pieces in your custard. When the mixture starts boiling, lower the heat even further down and start mixing even more vigorously. After a couple of minutes, the custard will thicken. The rule is: it's ready when you can split it with your finger on the back of a spoon: like the red sea :) Cover it with cling film (otherwise it will get a skin) or a lid and set it aside to completely cool down. In the winter, it's usually cold enough outside to use the balcony as a fridge, so you can save yourself some space.

Ready custard texture
2b. Alright, if you somehow manage to split your custard (by using too cold ingredients or boiling over too high heat or too long) you can save the situation. By splitting I mean that you are left with watery substance with floating grainy yellow pieces in it. It's not going to be the same but it will still be tasty. It might taste eggier.

Blend the cooked and split mixture with a hand or another blender. Set aside to cool down.

3. After the custard mixture is completely cool, whisk it very well with the mascarpone cheese. There should be no clumps and it should look nice and shiny. I usually use my hand mixer for that as the cheese is quite thick and after whisking my freaking hands off with the custard, I'm definitely not in the mood for any more hand whisking.

Mixed custard and mascarpone texture
4. In another clean and dry bowl whisk the cream with the vanilla until stiff peaks. If you overwhisk the cream and you split it, you need to start from the beginning with a new one. You can't salvage that. So, be careful.

5. Mix the rum with the cold espresso coffee in a bowl where you can dunk the cookies.

6. Dunk the cookies one by one in the coffee/rum mixture and lay them in either a rectangular glass baking pot or individual bowls. Don't let the cookies stay long in the mixture or they'll get too wet and fall apart or just be too soft and gross.

Dunking cookies for Dummies :)
7. Spread half the custard on the cookies.

8. Spread half the whipped cream on the custard layer.

9. Repeat steps 6, 7 and 8.

10. Sprinkle the cocoa powder on top of the tiramisu. The nicest way is to put the cocoa powder in a little sieve and shake it on top. Cover with cling film and put in the fridge for at least 3-4 hours, best overnight. If you decide to make a lot and would like to save some for later, you can directly put it in the freezer. It'll be good for 3 months, just either take it out to unfreeze overnight in the fridge or for an hour outside. Will taste like fresh.

11. Serve cold as dessert. Why not with my pumpkin spice latte?

Holiday tiramisu
It's really quite impressive and very doable. I'll be making it for Christmas for my parents. What are you cooking this year? Show me some pics, I would love to see them. Traditionally, I'm starting the prep for the stuffed Bulgarian turkey in a minute, can't wait till tomorrow to sink my teeth into it. You can find the recipe here.


Just had to show that moss I could see on the squirrel-eaten tree in front of my house.
17:00 Posted by IScreamKitchen 0

Thursday, 18 April 2013

Healthy Strawberry-Coconut Milkshake


For a hot minute last month, we enjoyed some lovely sunny weather here in Vienna and this in combination with the strawberries on the market (and the fact I had to clear out my fridge before a trip home) made me crave a fresh spring-summery drink. To be honest this recipe was a complete experiment and I just threw some stuff together and blitzed them up in the blender, but the result was incredibly satisfying! This is just a glass of heaven when it gets sweaty outside, it’s quite healthy and let’s not even mention how quick it is to prepare, takes seconds!

Healthy Strawberry-Coconut Milkshake

Strawberry-coconut milkshake recipe:

250 ml/8.5 oz light coconut milk
150 ml/5 oz yoghurt
500 g/1 lb strawberries (washed and without stems)
Honey to taste (I put 1 tbsp. per glass)

Preparation:

Blend all the ingredients together with a stick or a regular blender. To make it a truly summer shake either add some ice cubes to the drink or if you have a regular blender add the ice cubes while blitzing all the ingredients together and you’ll be left with something similar to strawberry margarita in texture. Cheers!

Healthy Strawberry-Coconut Milkshake

PS Taking those pictures laying in the grass in front of my place made my neighbours a little judgmental to say the least :)

17:29 Posted by IScreamKitchen 0

Thursday, 14 February 2013

Amazing Red Velvet Cupcakes with Caramelized Centres

Red velvet cupcakes
Whether you hate or love Valentine’s Day, there is absolutely no excuse for you not to stuff your face with some delicious desserts! In love? Yes? Then make this for your loved one. No? Celebrate it with a cupcake! Until recently I hadn’t even tried red velvet cupcakes, and I really didn’t understand what the fuss was all about. After I did, my cake world was seriously shaken! Those are so incredibly moist and full of flavour; so much more complex than a plain old sponge. I made those for new year’s and gave the last 2 to one of my best friends for her and her sister, but after eating hers she couldn’t help but nom on her sister’s too (sorry to give out your secret!). Cupcakes do come before family!

The only thing I was concerned about those was the atrocious amounts of red colouring needed to achieve a bright red colour. As I’m not a big fan of additives, I didn’t put by far as much as I should have, so mine ended up on the brown side. If you decide you want them super red, you have to add enough red colouring to the mixture that it looks like blood, as it darkens a bit later. My cupcakes are covered with a delicious cream cheese frosting, which goes so incredibly well with them. On the inside there was a hidden surprise: a caramelized piece of white chocolate, which gave a lovely complex texture to the cake. But enough of me yapping, there’s the recipe:


Red velvet cupcakes
Red velvet cupcakes recipe
(makes around 9)

For the cake:
1 cup sugar
1 egg
½ cup oil (I used sunflower seed, it’s very good because it’s tasteless, don’t use anything rich in flavour like olive or sesame seed oil!)
½ cup milk with a couple of drops of lemon juice in it
½ tsp. apple cider vinegar
½ cup brewed coffee (room temperature, otherwise it will scramble the egg)
1.25 cup flour
½ tsp. baking soda
½ tsp. baking powder
½ tsp. salt
1 tbsp. cocoa-plain
1 packet of vanilla sugar/ 5-6 drops of vanilla flavouring/ 2 tsp. vanilla extract/ 2 vanilla pods
Red food colouring (depends how much you need to use on the type you buy, just read instructions on the packaging)
Around 9 pieces of white chocolate
Cupcake/muffin baking tray
Cupcake paper wrappers

For the cream cheese frosting:
½ cup cream cheese
½ cup sifted confectioners’ (powder) sugar
2 tbsp. softened butter (no margarine!!!)
½ packet of vanilla sugar/ 3-4 drops of vanilla flavouring/ 1 tsp. vanilla extract/ 1 vanilla pod

Preparation:
1. Preheat the oven to 165 C/325F

2. Beat the egg with the sugar until creamy (with a mixer) then add slowly while mixing the oil, milk, vinegar, coffee, flour, baking soda and powder, salt, cocoa, vanilla.

3. Add the food colouring, as mentioned before, if you’d like a bright red cupcake, your dough must look very very bright red, as it darkens with baking.

4. Pour the mixture in a jug, so it’s easier to pour in the cupcake shapes.

5. Put your cupcake wrappers in the holes of the cupcake baking tray.

6. Pour the mixture in each wrapper, so it fills up to 2/3 of the wrapper. Add one piece of white chocolate (if you don’t have white, just skip it, other chocolate won’t fit as well with the other ingredients). The white chocolate will drop to the bottom and caramelize, making for a lovely rich milky caramel. If you’d like something different, you can also put a white chocolate truffle or a Lindor chocolate covered in flour, in the middle of your mixture (poor half of the needed mixture for 1 wrapper, put the chocolate, poor the rest of the mixture). This way your chocolate won’t drop to the bottom and make for a nice surprise in the middle.

7. Bake for about 30 minutes or until a toothpick comes clean.

8. Wait for the cupcakes to fully cool down before you put the icing on top, otherwise, it will melt.

9. For the icing just beat together all the ingredients and with a butter knife spread it on top of each cupcake. I used a piping bag for a cleaner effect, but don’t expect to be able to make any shapes with it, as the mixture is a little on the runny side. If you’d like to decorate with the icing, you have to put more icing sugar, so the mixture stiffens, but then it won’t be as silky, light and delicious.

10:47 Posted by IScreamKitchen 0

Thursday, 27 December 2012

Honey Holiday Cookies


I am not the biggest fan of gingerbread; instead, since I was rather young, I make those honey cookies for Christmas and New Year’s. They are rather similar to gingerbread ones in that you can mold the dough the same way. However, this one is not that sharp and spicy, but rather mild honey-cinnamon-like (big surprise there!). I like to dunk mine in my milk or pumpkin spice latte. This recipe makes for a huge amount; I couldn't count them as the elves were continuously eating them before I took all the batches from the oven.

Decorated honey cookies

Honey holiday cookies recipe:
2 tbsp. honey
1 tsp. baking soda
2 eggs
1 cup caster sugar
1 cup sunflower seed oil
700-900 g/25-32 oz flour
2 tbsp. powdered cinnamon

Preparation:
1. Heat the oven to 200C/390F.


Proof of temperature choice :D
2. Mix well the honey with the baking soda in a small bowl or cup until it gets pasty.

Honey and baking soda mix
3. Mix the eggs with the sugar until fluffy (preferably with a mixer), add the soda and honey paste; then slowly while mixing pour the oil little by little. Next, slowly start adding the flour and cinnamon while mixing. It depends on the brand how much flour you need, could be different every time. You might need to switch to the spiral looking whisks of your mixer and even start mixing with a big wooden spoon as the dough gets tougher. By the end you’ll need to knead it to incorporate the last bits of flower. It is important that you don’t overwork the dough as it will get too tough and the cookies will be too hard to bite on. The consistency of the dough you are looking for is play-doh like, it shouldn't be neither sticky (you won’t be able to cut it) nor too hard.

How to knead
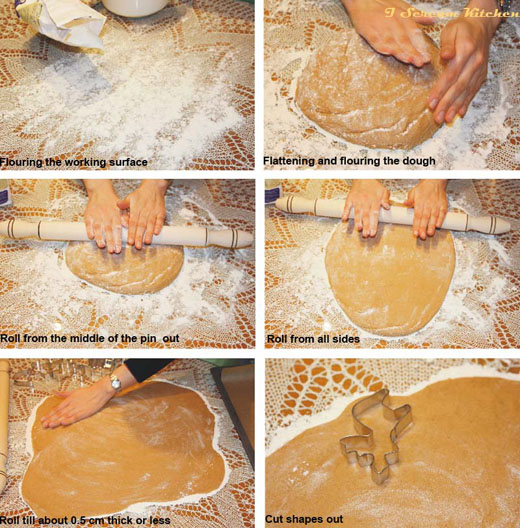
4. If you don’t have a rolling pin and cookie cutters or you just don’t feel like all the hassle, you could make little balls out of the dough and bake them like that. Otherwise, flour your clean smooth surface (table) very well and flatten the dough on top. Sprinkle some flower on top of it and on your rolling pin so the dough doesn’t stick (do that every time the dough gets sticky) and start rolling from the middle out on all sides (vertically, horizontally, diagonally). The easiest way for me to roll (with a normal rolling pin like the one on the pictures) is to have my hands in the middle of the pin and slide them to the sides as I roll. Make sure the dough is the same thickness everywhere or some parts of the cookies will burn and others will be raw. You are looking for 0.5 cm/0.2 inches thickness.

How to roll
5. Sprinkle some more flower on top and smooth it with your hands. Now, you can cut out your shapes. If you don’t have cookie cutters, you can use glasses that have thin rims. This way you can make circles, crescents and all sorts of variations. A cute idea is to cut a little rectangular shape at the bottom of your cookie, so you can hang it on the rim of your coffee cup. Once you’ve cut your shapes, just re-knead your dough and roll it again, until finished. Don’t forget to flower the table or working surface, otherwise you won’t be able to remove your shapes from it.

Not yet baked cookies
6. Put your unbaked cookies on some baking paper-laid baking tray (if you don’t have baking paper just oil and flour the tray) and bake for between 5-10 min depending on the thickness of your dough. You are looking for golden brown.

7. Decorate your cookies if you like. You can sprinkle them with powdered sugar; stick them together with butter cream, chocolate, jam, etc. I went for encasing them with marzipan, which I coloured and rolled and decorated them further with icing. I used Dr. Oetker for all the decorations.

Honey Cookies


The ready cookies

By the way, look at these crazy old scales I found in my apartment! Funny huh! Next to them is the recipe for the cookies; love it when they looked all loved and used!

Old scales and the original recipe
Facebook | Pinterest | BlogLovin | Twitter

Would you make these lovely cookies at home?
16:15 Posted by IScreamKitchen 0

Sunday, 23 December 2012

Home-Made Pumpkin Spice Latte/ Hot Chocolate

Pumpkin Spice Latte
Every fall a certain coffee shop chain comes up with the awesome pumpkin spice latte and I marvel at how expensive it is! I absolutely love it and I want to have it all the time, so I decided to make my own, which is loads cheaper, I know exactly what goes into it and is quite easy to make. I like making a big batch of the pumpkin spice milk enough for around 5 servings and I keep it in the fridge, so I can just warm it up and add it to my coffee when needed. It keeps for quite long, almost for a week, depending on what type of milk you use. If you don’t like coffee, you could turn it into a pumpkin spice hot chocolate by adding Nutella, or some ground chocolate (white, milk and dark work great) instead of the coffee. Just don’t forget to adjust the amount of sugar you put as chocolate already has quite some sugar in it.

If you want to go in for the kill, you can make it into a mocha if you have both chocolate and coffee. Conversely, if you can’t find pumpkin/ pumpkin puree, skip it and you have yourself gingerbread latte.
Anyway, enjoy it with some home-made cookies! J

Pumpkin Spice Latte

Home-made pumpkin spice latte/ hot chocolate recipe
(makes 5)

4 cups milk + some for frothing (optional) – I used 3.5% but you could use any kind, including soy, rice, etc.
1 tsp. cinnamon
1 tsp. dried ginger
¼ tsp. nutmeg
¼ tsp. powdered cloves
1 tsp. vanilla extract/ a couple of drops vanilla flavouring
8 tbsp. pumpkin puree (or butternut squash) - check out how to make it here.
5 shots of coffee or 5 tbsp. Nutella (if you are an instant coffee fan, you can use that instead)
Sugar to taste
Whipped cream (optional)

Preparation:
1. Pour the milk, spices, sugar, pumpkin puree and nutella (if you’re going for a hot chocolate version) in a pot and bring almost to a boil over medium high heat, while stirring constantly.

2. Sieve if you want the latte to be super smooth.

3. Pour a shot of hot coffee (if gone for the actual latte version) and then pour some of the pumpkin spice milk, leaving a little space for the topping, if you’d like some.

4. Make the topping of your choice. I have 3 offers. Either froth some of the pumpkin spice milk, normal milk, or top with some whipped cream. If you decide for the pumpkin spice milk, it will be orange-brown. If you have a milk frother, you can froth your drink up straight in the cup you are serving it. If you are going for the milk version, froth it up in a separate cup and spoon the froth on top. If you don’t have a frother, you can use a stick blender; just have the liquid that’s being frothed up be the same temperature as the other parts of the drink (almost boiling). Also, you could top your pumpkin spice drink with some marshmallows, smarties or powdered cinnamon.

5. Serve with some cookies! 
                                        
Would you make these lovely cookies at home?
15:53 Posted by IScreamKitchen 0

Chunky Oatmeal Cookie Magic

Oatmeal cookies

Christmas time is also cookie time for me (this may or may not be linked to the arrival and welcoming of Santa with cookies and milk…) and I have 2 favourite kinds, this oatmeal kind and the soon-to-come honey cookies. These oatmeal ones are delicious and chunky and perfect for before bed with a glass of milk or for breakfast.

When I was a kid I got a recipe for those cookies and I quite liked it, so decided to make them again; however, once I started making them, I realized that I was missing a lot of the elements, so I substituted them with what I had on hand. The new cookies were amazing! So much better than the original! Unfortunately, I had forgotten what and how much of each ingredient I had used. So, for years, I was trying to remember and I believe I finally made them the way they accidentally had turned out.

I made those last week for some friends and classmates, and two girls from my class claimed that I should start selling them, as they were utterly delicious. So, if you don’t want to wait for the I-Scream-Kitchen-branded cookie line, the recipe is below!J Also, they are super easy to make if I could pull them off when I was around 8-10!

Oatmeal cookies
Oatmeal cookies recipe
(makes 18 cookies)

3/4 cup brown sugar – I used demerara
100 g/3.5 oz softened butter
1 large egg
1 tsp. vanilla extract/a couple of drops of vanilla flavouring
1 tbsp. milk
1 cup flour
½ tsp. baking soda
½ tsp. baking powder
½ tsp. salt
1.25 cup chunky oatmeal
½ tsp. cinnamon
100 g dried cranberries/ dried cherries/raisins
1 tsp. lemon rind

Preparation:

1. Set the oven to 180 C/ 355 F. Mix the butter and sugar well, until creamy. Then add the egg, vanilla and milk and mix until homogenous. No need to use a mixer, you can use a fork instead.

2. Slowly add the flower, baking soda, baking powder and salt, while mixing.

3. Add the oatmeal, cinnamon, dried fruit and lemon rind and mix well.

4. Put some baking paper on a baking tray (if you don’t have baking paper, butter the tray and cover with a dusting of flour) and put a tablespoonful of the mixture per cookie. Set the cookies at least 7 cm/ 3 inches away from each other, so they don’t become one big cookie. You don’t need to worry about the shape as they will start looking more like cookies rather than wet blobs as they bake.

5. Bake for 10-15 minutes, or until golden brown. You will probably need to bake in 2 go’s unless your oven is quite big.

If you are not a fan of the old cookie and milk combo, next recipe is a pumpkin spice latte one, that would be perfect to go with any cookies.


Would you make those at home?
14:08 Posted by IScreamKitchen 0

Sunday, 16 December 2012

Holiday Double-Layer Pumpkin Cheesecake

Double-layered Pumpkin Cheesecake

There is an abundance of pumpkins and butternut squashes (my personal favourites) in the fall/winter season and this year I went all out on the pumpkin recipes. I love cheesecake and I make different kinds quite often. I particularly like baked ones in the winter as they give you that warm and fuzzy feeling that is usually reserved for your mum’s cooking.

The recipe I’m sharing is for a double-layered pumpkin cheesecake (half vanilla, half pumpkin pie flavour), which has a little bit of a funny story behind it. I made this for dessert for a Halloween party this year, but as I got a bit overzealous on the tequila, I might have ended up in bed while my, also quite “spirited”, guests were nomming it up from the baking tray, while standing up. They liked it quite a bit so I ended up making it again and it’s quite a festive one to try out for the holidays, as it has loads of wintery holiday-like spices in it.

I prefer making it with butternut squash instead of with pumpkins as butternut squash is a lot more flavourful and a lot sweeter. Actually, if you buy a canned pumpkin puree, it is usually indeed butternut squash inside. However, I couldn't find a canned puree in my country, so I made it myself (which is super easy) from an awesome fresh squash. Read on for instructions.

I would suggest baking it in a spring form, so you can put it in a serving dish later, if you’re making it for others. Otherwise, you can use anything that is ovenproof. For this recipe, I used individual cups.

Just have in mind that, even though the baking takes only about 40 minutes, you have to allow for it to cool off for several hours. So, prepare this a bit in advance, so it can set. If you make it in individual cups, like me, you can pull it off with shorter cooling time, as you eat it straight from the baking dish.

So there it is:
Double-layered Pumpkin Cheesecake

Pumpkin Cheesecake
(serves 6-8)
600 g/ 21 ounces cream cheese
200 g/ 7 ounces Greek yoghurt
2 large eggs
Several drops vanilla flavouring
1 tsp. lemon rind (optional)
½ cup caster sugar
½ cup pumpkin puree (about 200 g pumpkin or butternut squash)
1 tsp. ground cinnamon
1 tsp. ground ginger
¼ tsp. ground cloves
¼ tsp. ground nutmeg
2 tbsp. soft butter
200 g/ 7 ounces whole-grain biscuits/crackers (the crunchier, the better)

Preparation:
1. Crush the biscuits/crackers in a blender. I had no blender, so I put them in a plastic bag, wrapped the bag in a towel and hit them with a thick glass bottle until they got powdery (use a rolling pin, if you have one, instead). This is great for anger management…

Preheat the oven to 160 C/320 F.

2. Melt the butter and pour it over the crushed biscuits/crackers and mix them well. Put the mixture in the baking tray you will be using to bake the cheesecake in. Press the mixture well with your fingers so it sticks to the bottom and put the tray in the fridge so it hardens.

3. Mix cream cheese, yoghurt, eggs, sugar, vanilla and lemon rind with a mixer until fluffy. Don’t leave any lumps.

4. Spread about half the mixture over the hardened biscuit/cracker crust.

5. Add the pumpkin puree and the spices to the leftover cream cheese mixture and mix well.

If you don’t have pumpkin puree, like me, clean and peel some pumpkin (better butternut squash, as it is sweeter), chop it in small pieces and put it in the microwave with the tiniest amount of water in a microwaveable dish with a lid for about 8-10 minutes. Remove the leftover water and blend well with a stick blender, or whatever blending kitchen appliance you have. If you don’t have one, pass the boiled pumpkin through a sieve or a muslin cloth.

6. Spread the pumpkin cream cheese mixture over the white one and put in the oven for about 40 minutes. Then, switch off the oven and let the cheesecake sit for at least 30 more minutes in the switched-off oven (the oven door slightly open). If you have more time just leave it in until the oven completely cools off. To lower the chances of the cake cracking, run a knife on the edges of the cake so they separate from the baking dish. Next, take the cheesecake out and let it cool slowly first and then, put it in the fridge, covered with some cling film.

7. Serve completely cold. You can add some whipped cream. Bon appetit! 


Would you make this at home?
13:02 Posted by IScreamKitchen 2